

If you intend to leave your RX-only iGate online permanently, think again. Don’t repeat the signals to the APRS-IS network beyond experimentation! If you wish to be a contributing station to the APRS-IS network, don’t use an RTL-SDR dongle. Instead, in place of that, use a capable two-way ham radio. All you need is a Baofeng connected with an audio cable to make that happen.
If you’ve been researching how to build an APRS iGate, surely you’ve seen quite a few articles on setting up a Raspberry PI or other Linux-based solution. But what if you don’t have a Raspberry PI laying around? What if you’re not a Linux geek? Well, this is your simple Windows-based solution. I’ll first provide the parts list and then get into the details.
| Item Needed | Description | Source |
| Base Station Antenna and Cabling | For receiving APRS audio | Local HAM shop, Home Depot, Internet |
| RTL-SDR USB Dongle | For connecting the antenna to the computer | Internet (Amazon) |
| AIRSPY SDR# | Your software defined radio receiver | https://airspy.com |
| Realtek Stereo Mix | Turns output of SDR# into a virtual playback device to be received by Direwolf | https://download.cnet.com/Realtek-High-Definition-Audio-Codec-Windows-7-8-8-1-10-64-bit/3000-2120_4-77507761.html |
| Direwolf | Virtual TNC | https://github.com/wb2osz/direwolf |
| APRS-IS Passcode | For sending data to the APRS-IS network. | http://n5dux.com/ham/aprs-passcode/ |
| PinPoint APRS | For displaying the received data | http://pinpointaprs.com/ |
Base Station Antenna
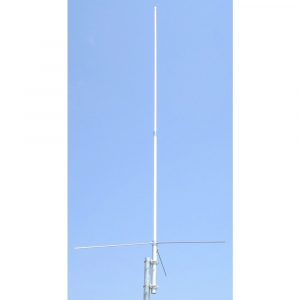 Perhaps the most important part of this puzzle is the antenna. While you may be able to operate a handie-talkie indoors, hitting local repeaters just fine, receiving signals from APRS stations is a whole new consideration. Noisy signals and weak signals will result in lost data.
You don’t have to spend a fortune (even a Tram 1480 from Home Depot for $50 should be fine), but a good base antenna will make a world of difference. And while the antenna is important, placement of the antenna is even more important! The the old mantra on placement is, “the higher the better” for the greatest reception. If you keep your antenna indoors, it’s going to suffer loss from the construction of the house, inside wiring and other electronic devices. And trust me on this one: a 19″ mag mount antenna on a cookie sheet indoors will not capture APRS traffic. Your antenna should be free from other obstructions (walls, buildings, mountains, etc.) as much as possible.
Also, keep in mind that you’ll lose some of that signal as it travels from the roof to your station. If you can afford the lowest loss cable: LMR-600, get it! Conversely, don’t expect much from cheapest RG-174 cable but if it works, great! Check out this article written by the folks over at WinSystems for some cabling ideas: http://www.winsystem.org/faqs/faqs/.
RTL-SDR USB Dongle
There are many different RTL-SDR models on the market with varying levels of frequency reception and sampling rates. If you have other uses for the dongle, then get what you whatever you think works for you. But if all you’re trying to is get an APRS iGate built, this dongle on Amazon for $21.95 will work fine: https://www.amazon.com/dp/B0129EBDS2/?coliid=IWGTQGO4EAVPV&colid=17RR9JAWTJVUG&psc=1&ref_=lv_ov_lig_dp_it
AIRSPY SDR#
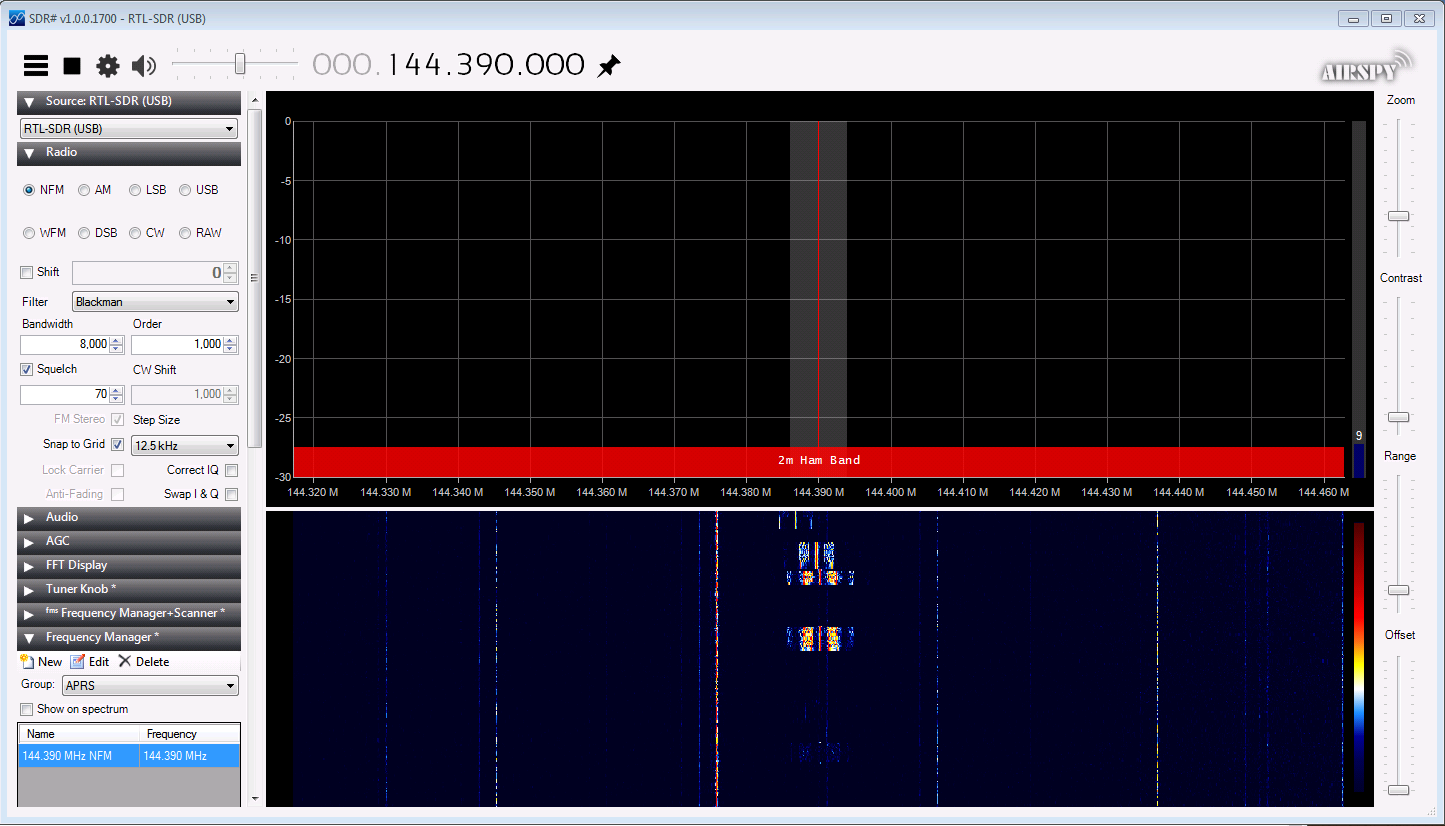
AIRSPY is a software defined radio receiver that captures the audio sent over APRS frequency 144.390. Think of it as a ham radio scanner for your computer. This software works well with the RTL-SDR dongle mentioned above. Download it free here: https://airspy.com/download/.
After installing this software, tune it to 144.390 and listen for the APRS sounds. If you happen to have a radio like a Kenwood TH-D72A, you can send a beacon to verify that the antenna is in a good place, that the RTL-SDR dongle is installed correctly and that the SDR# software recognizes the dongle. Otherwise just listen for something that sounds like an old modem.
SAMPLE APRS AUDIO
Realtek Stereo Mix
For some people, getting the sound driver to function correctly will be the hardest part of this project. So why do we need to do this? Well because AIRSPY SDR# and Direwolf, which will be discussed next, don’t talk to each other. RealTek Stereo Mix is a sound driver compatible with many sound cards which turns the output of SDR# into the input of Direwolf.
Maybe you’re thinking, “why not just put a patch cable between the speaker out and line in of my computer”? The reason is because you would create a feedback loop. It wouldn’t work and you could cause damage to the sound card. Of course you could safely do this with two computers – one for the SDR# and the other for the remainder of parts needed. I’ll let you experiment with that idea on your own!
How to install the Realtek Stereo Mix driver varies by computer and OS. I’ll just refer you to video below as a general explanation. Once you have that figured out, scroll down to Direwolf.
DIREWOLF
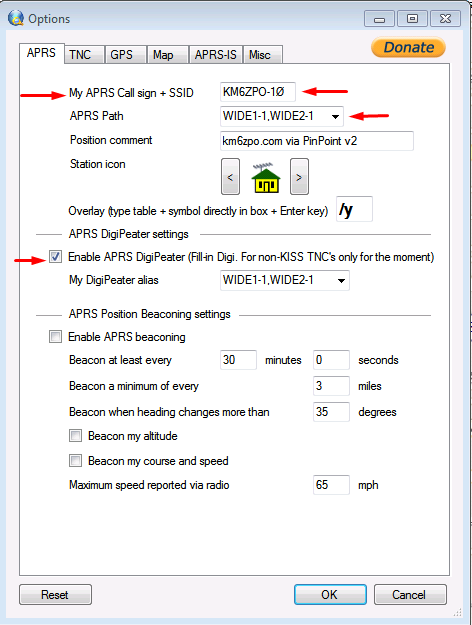
Direwolf is a software TNC (terminal node controller) which receives the audio from SDR#, demodulates it into text and passes it along. Think of it as an old school modem. It literally listens for sound much like a computer modem from the 90’s and converts that sound into a digital format. There’s a small text file to edit, but’s fairly self-explanatory. Once you start the program up, it will listen to any sound card (including the one you just installed) for APRS transmissions. You’ll use Direwolf as TNC to receive data into PinPoint APRS. Most of the settings will be left to default in the direwolf.conf file. Be sure to add an SSID to the end of your call sign (for example, mine is KM6ZPO-10). The -10 SSID is the standard for digitpeaters and iGates but you can use any valid SSID.
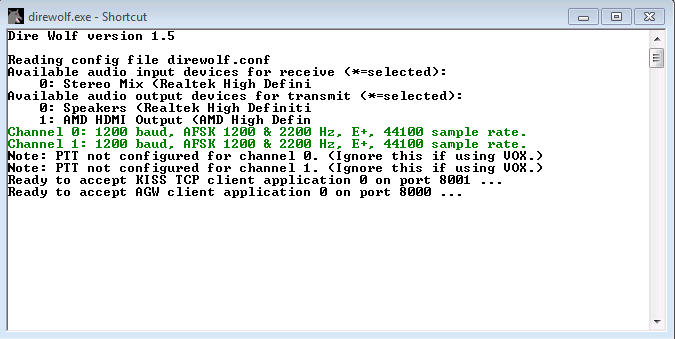
DIREWOLF SETUP
If you have no conflicting services running, and the Realtek Stereo Mix driver was installed correctly, you should see “Realtek High Definit” as the audio input launching Direwolf. You can ignore the PTT warnings since you are not sending anything. The KISS TCP port 8001 on your local IP 127.0.0.1 will be used later in PinPoint.
APRS-IS PASSCODE
In order to transmit any data to the APRS-IS network from your iGate, you’ll need a passcode. Navigate to http://n5dux.com/ham/aprs-passcode/ and enter only your call sign to receive your passcode. (No -SSID) You’ll use that passcode to setup the APRS-IS service within PinPont.
PINPOINT APRS
Your next step is to download, install and configure PinPoint. Get it here: http://pinpointaprs.com/download.html
First, launch the Direwolf program you previously installed and then launch the PinPoint program. Go through the basic setup screens which will include your call sign SSID. The screenshots below show you all the other important settings. NOTE: Don’t use my callsign!
OPTIONS
This is an experiment only!
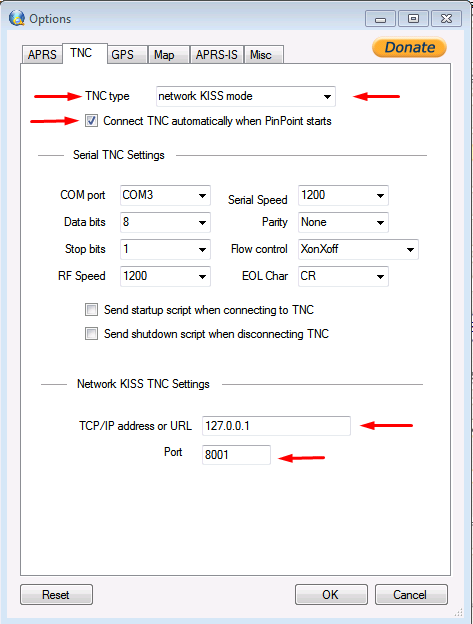
TNC
Ignore the COM port settings in the TNC settings. The only thing that matters in this screen is that you selected network KISS as the TNC and verified that the address is your own computer and correct port. It needs to match what was setup in Direwolf. It’s optional to connect the TNC automatically upon starting PinPoint.
APRS-IS SETTINGS
Be sure to enable RF to IS iGate and put your passcode in here. It’s optional to connect APRS-IS automatically. NOTE: Don’t use my passcode!
This is an experiment only!

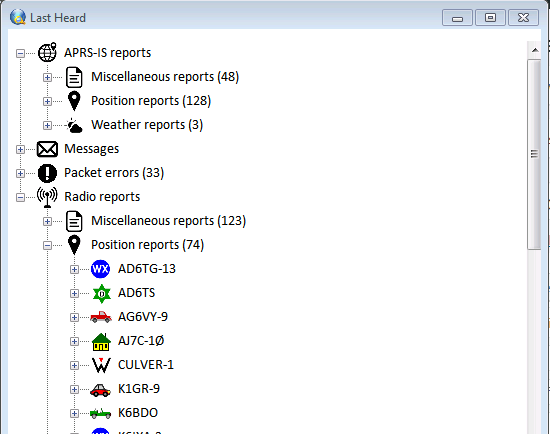
LAST HEARD WINDOW
Once you have all the settings configured, in the PinPoint tools menu, you’ll need to connect to TNC and connect APRS-IS to start receiving data. You can monitor the Last Heard window to monitor what’s coming in. You’re of course going to be receiving APRS-IS data if you setup the passcode correctly, but what’s really important is the Radio reports. Expand the Radio reports and then Position reports and give it a while to populate. You’re going first see reports from stationary objects like WX (weather) and green stars which usually indicate major digipeaters. After a while you should starting seeing mobile station reports.
VERIFYING APRS-IS IGATE
First check the map to see if there are any stations broadcasting near you. Then run a search on APRS.fi to see your station information. For my home station this is the link: https://aprs.fi/info/a/KM6ZPO-10
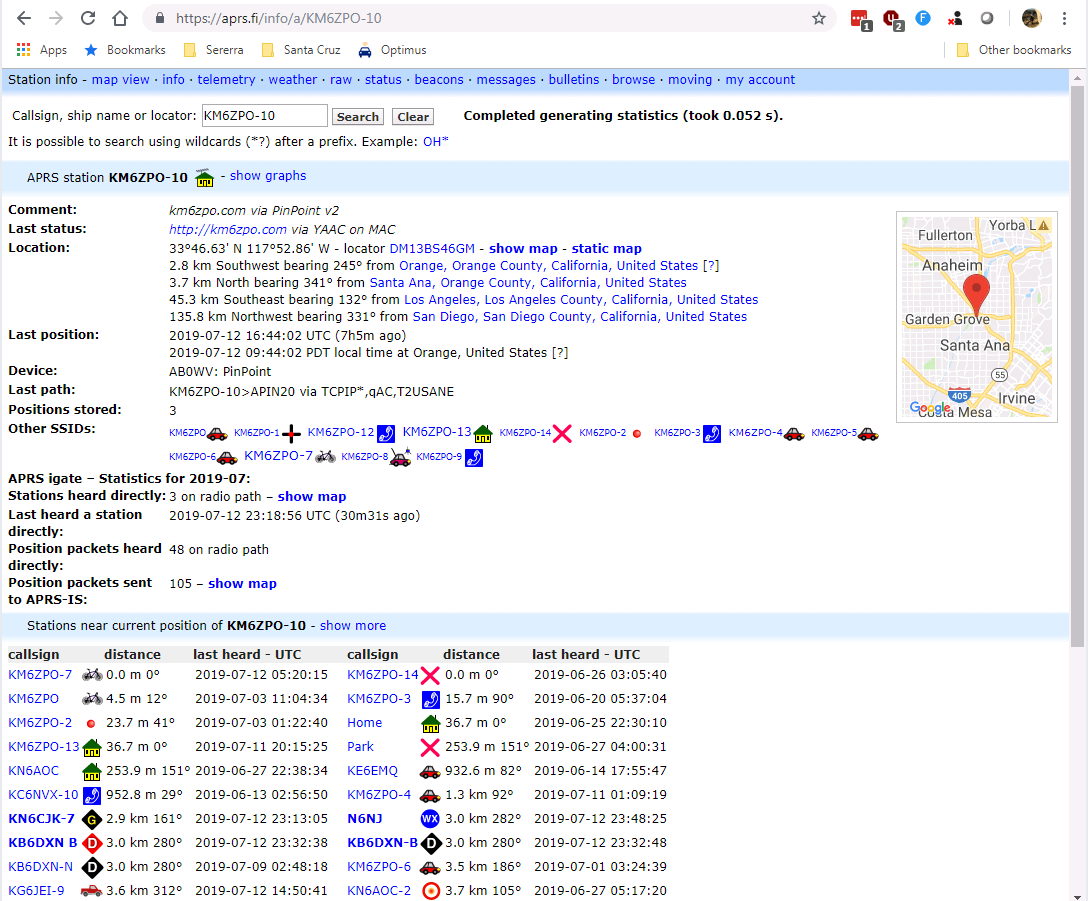
If your station is properly setup and repeating other stations’ APRS traffic, you’re going to see entries other than digipeaters under Stations heard directly by (your call sign – SSID).

I can in the logs that see that station KF6WKP drove near my home. I can further confirm that by checking the raw packets log for that station. If your station is not repeating anything, be patient. You just may not have had anyone in range of your station. Also, if there are other stations nearby, they may be getting the signal first and the data may be getting de-duped. You’ll know for sure if you broadcast from a radio you own.
Feel free to contact me if you have any questions are comments about this article.